Okay, so this is the only bit of mandatory theory. In order to begin to write HTML, it helps if you know what you are writing.
HTML is the language in which most websites are written. HTML is used to create pages and make them functional.
The code used to make them visually appealing is known as CSS and we shall focus on this in a later tutorial. For now, we will focus on teaching you how to build rather than design.
The History of HTML
HTML was first created by Tim Berners-Lee, Robert Cailliau, and others starting in 1989. It stands for Hyper Text Markup Language.
Hypertext means that the document contains links that allow the reader to jump to other places in the document or to another document altogether. The latest version is known as HTML5.
A Markup Language is a way that computers speak to each other to control how text is processed and presented. To do this HTML uses two things: tags and attributes.
What are Tags and Attributes?
Tags and attributes are the basis of HTML.
They work together but perform different functions – it is worth investing 2 minutes in differentiating the two.
Tags are used to mark up the start of an HTML element and they are usually enclosed in angle brackets. An example of a tag is: <h1>. Most tags must be opened with <h1> and closed with </h1> in order to function.
Attributes contain additional pieces of information. Attributes take the form of an opening tag and additional info is placed inside.
An example of an attribute is:
<img src"mydog.jpg" alt="A photo of my dog.">
In this instance, the image source (src) and the alt text (alt) are attributes of the <img> tag.
Golden Rules to Remember
The vast majority of tags must be opened (<tag>) and closed (</tag>) with the element information such as a title or text resting between the tags.
When using multiple tags, the tags must be closed in the order in which they were opened. For example:
<strong><em>This is really important!</em></strong>
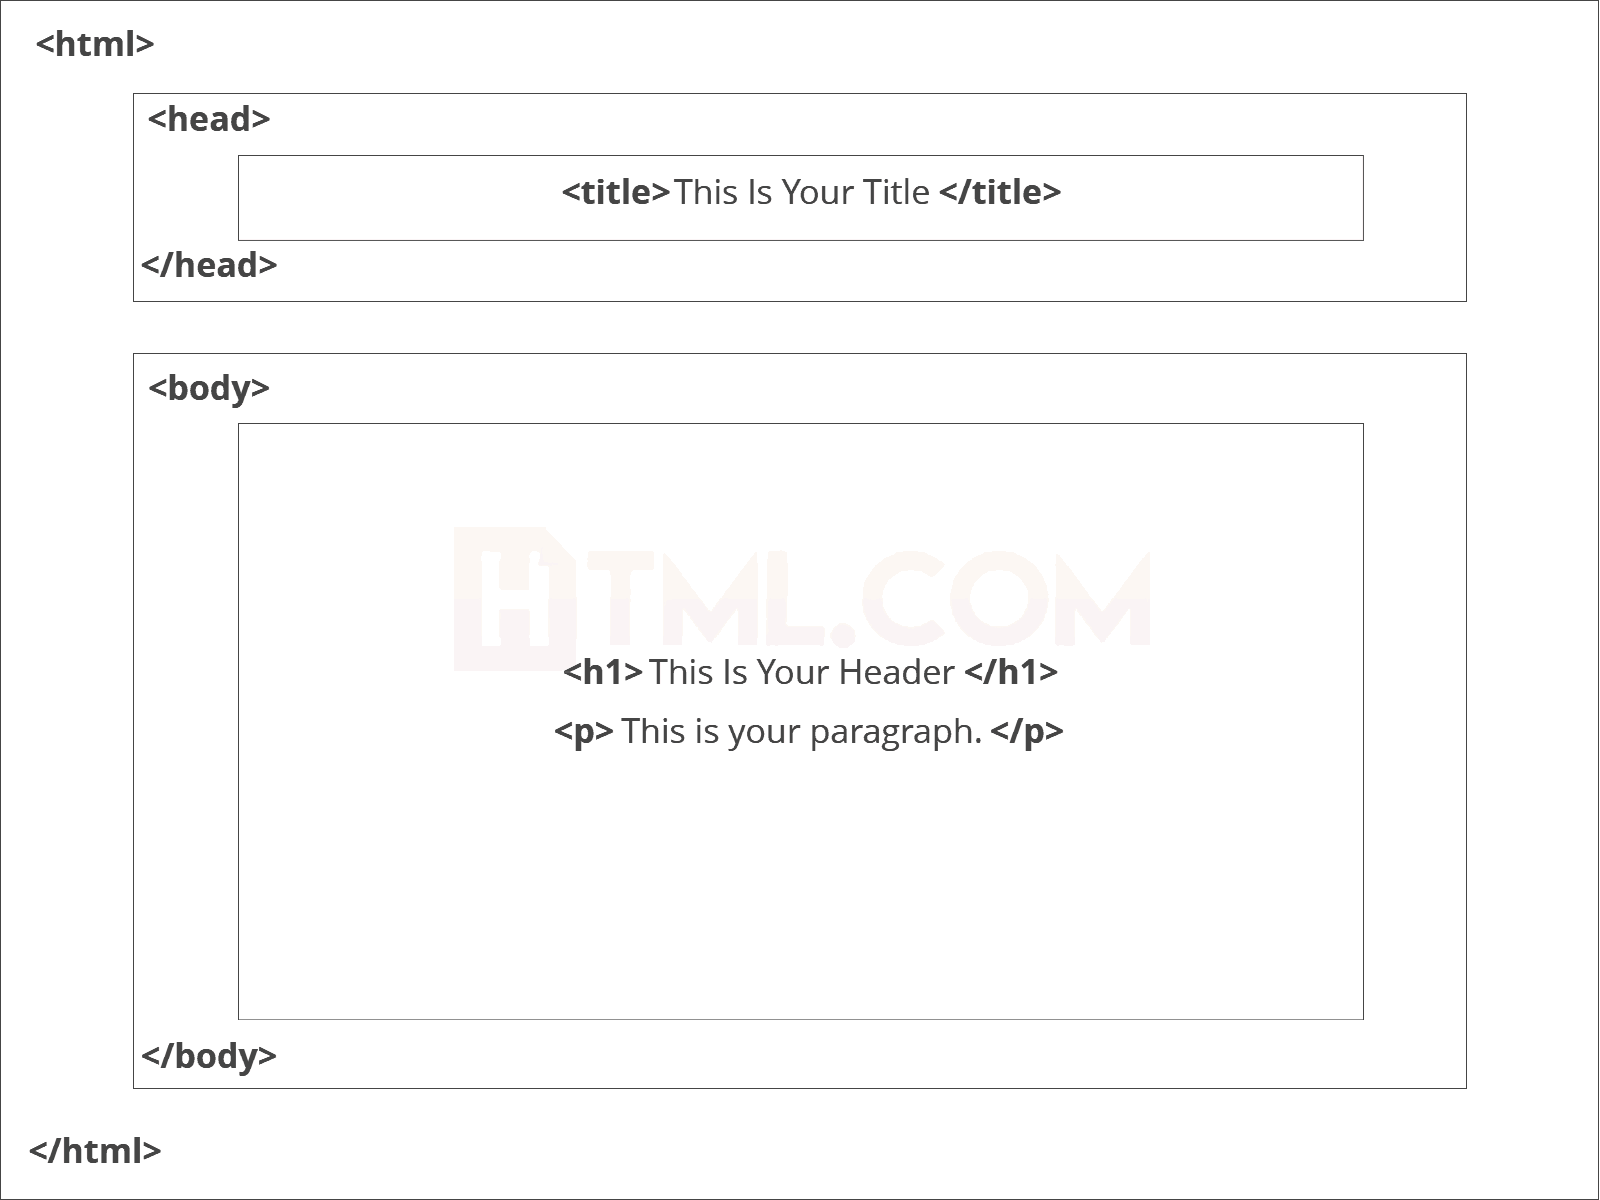
Basic Construction of an HTML Page
These tags should be placed underneath each other at the top of every HTML page that you create.
<!DOCTYPE html> - This tag specifies the language you will write on the page. In this case, the language is HTML 5.
<html> - This tag signals that from here on we are going to write in HTML code.
<head> - This is where all the metadata for the page goes — stuff mostly meant for search engines and other computer programs.
<body> - This is where the content of the page goes.
This is how your average HTML page is structured visually.
Further Tags
Inside the <head> tag, there is one tag that is always included: <title>, but there are others that are just as important:
<title>
This is where we insert the page name as it will appear at the top of the browser window or tab.
<meta>
This is where information about the document is stored: character encoding, name (page context), description.
How to Add HTML Headings to Your Web Page
In HTML, headings are written in the following elements:
<h1>
<h2>
<h3>
<h4>
<h5>
<h6>
As you might have guessed <h1> and <h2> should be used for the most important titles, while the remaining tags should be used for sub-headings and less important text.
Search engine bots use this order when deciphering which information is most important on a page.
How To Add Text In HTML
Adding text to our HTML page is simple using an element opened with the tag<p> which creates a new paragraph. We place all of our regular text inside the element <p>.
When we write text in HTML, we also have a number of other elements we can use to control the text or make it appear in a certain way.
Element
Meaning
Purpose
<b>
Bold
Highlight important information
<strong>
Strong
Similarly to bold, to highlight key text
<i>
Italic
To denote text
<em>
Emphasized Text
Usually used as image captions
<mark>
Marked Text
Highlight the background of the text
<small>
Small Text
To shrink the text
<strike>
Striked Out Text
To place a horizontal line across the text
<u>
Underlined Text
Used for links or text highlights
<ins>
Inserted Text
Displayed with an underline to show an inserted text
<sub>
Subscript Text
Typographical stylistic choice
<sup>
Superscript Text
Another typographical presentation style
These tags must be opened and closed around the text in question.
How To Add Links In HTML
As you may have noticed, the internet is made up of lots of links.
Almost everything you click on while surfing the web is a link takes you to another page within the website you are visiting or to an external site.
Links are included in an attribute opened by the <a> tag. This element is the first that we’ve met which uses an attribute and so it looks different to previously mentioned tags.
The <a> (or anchor) opening tag is written in the format:
<a href="https://blogging.com/how-to-start-a-blog/">Your Link Text Here </a>
The first part of the attribute points to the page that will open once the link is clicked.
Meanwhile, the second part of the attribute contains the text which will be displayed to a visitor in order to entice them to click on that link.
If you are building your own website then you will most likely host all of your pages on professional web hosting. In this case, internal links on your website will be <a href=”mylinkedpage.html”>Link Here</a>.
How To Add Images In HTML To Your Website
In today’s modern digital world, images are everything. The <img> tag has everything you need to display images on your site. Much like the <a> anchor element, <img> also contains an attribute.
The attribute features information for your computer regarding the source, height, width and alt text of the image.
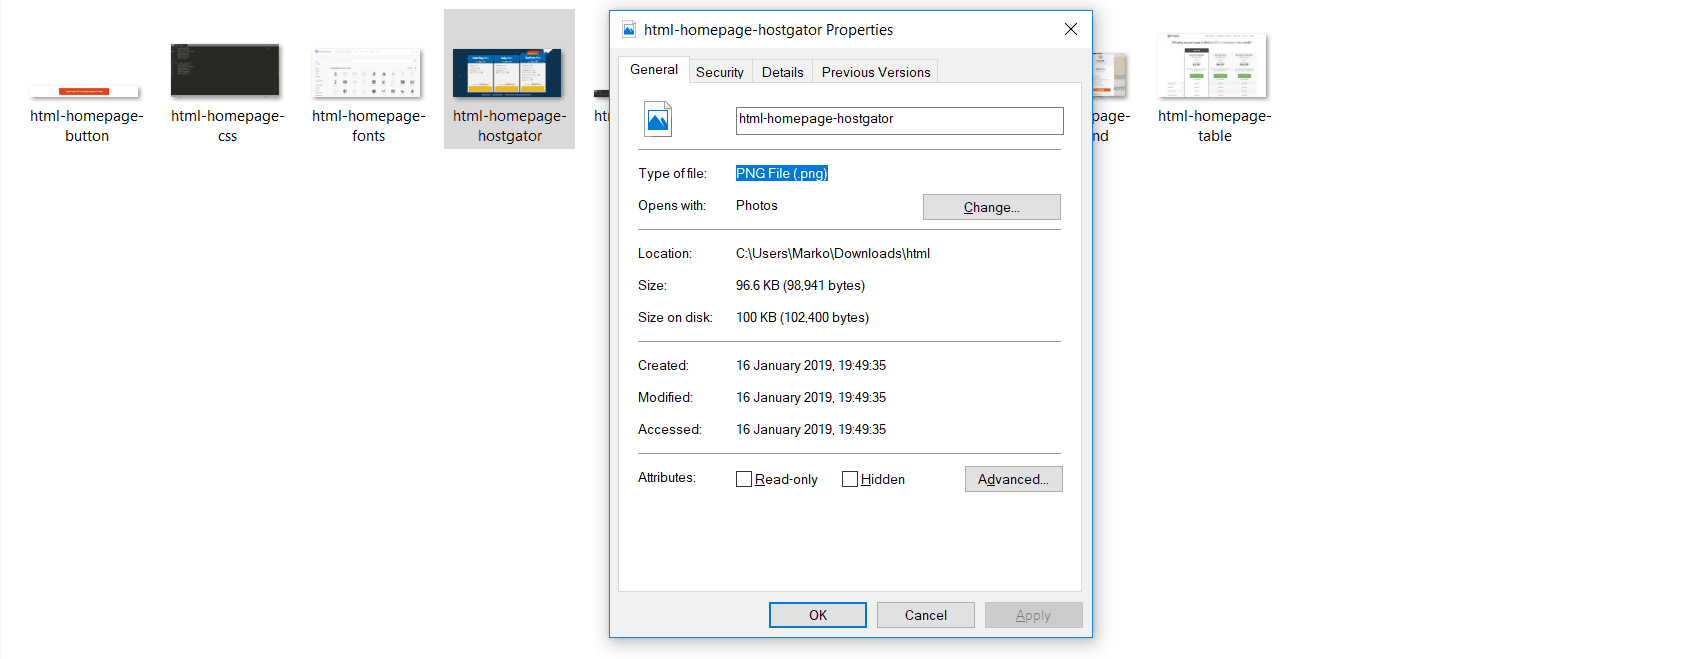
You can check the file type of an image by right-clicking the item and selecting ‘Properties'.
You can also define borders and other styles around the image using the class attribute. However, we shall cover this in a later tutorial.
The file types generally used for image files online are: .jpg, .png, and (less and less) .gif.
Alt text is important to ensure that your site is ranked correctly on search sites and also for visually impaired visitors to your site.
The <img> tag normally is written as follows:
<img src="yourimage.jpg" alt="Describe the image" height="X" width="X">How To Make an HTML List
In web design, there are 3 different types of lists which you may wish to add to your site.
Ordered List
The first is an <ol>: This is an ordered list of contents. For example:
An item
Another item
Another goes here
Inside the <ol> tag we list each item on the list inside <li></li> tags.
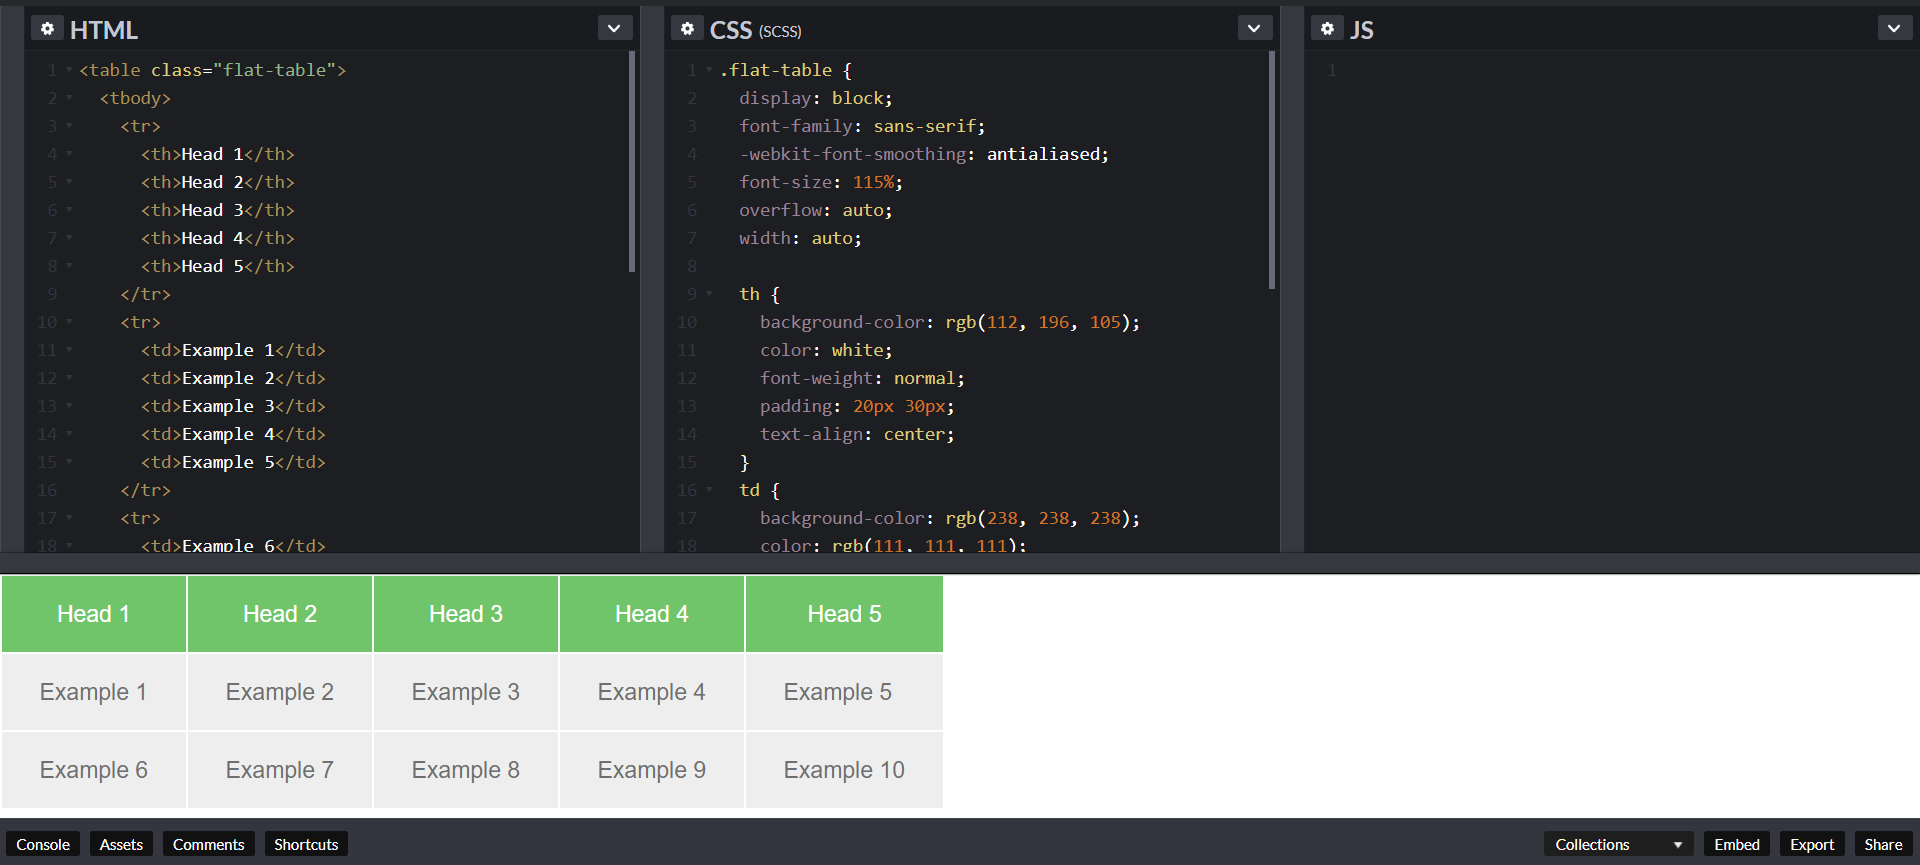
Tables can be styled in various ways – Codepen.io offers live previews to keep track of changes.
Another way to keep your website looking neat and orderly is through the use of a table.
When drawing a table we must open an element with the <table> opening tag. Inside this tag, we structure the table using the table rows, <tr>, and cells, <td>.
This will produce a 2-row table with 3 cells in each row.
Table Tag
Meaning
Location
<thead>
Table Head
Top of the table
<tbody>
Table Body
Content of the table
<tfoot>
Table Foot
Bottom of the table
<colgroup>
Column Group
Within the table
<mark>
Marked Text
Highlight the background of the text
<small>
Small Text
To shrink the text
<th>
Table Header
Data cell for the table header
How To Close an HTML Document
You’ve reached the end of our absolute beginners HTML tutorial.
The final step we need to complete is to close the <body> and <html> tags at the end of each page using the following HTML code:
</body> </html>
You’ve also learned to add headings, text, images, links, lists and basic tables to these pages.
Troubleshooting
In case things didn’t work out as intended, simply check your HTML code against the examples below.
Index.html troubleshooting code:
<!DOCTYPE html> <html> <head> <title>My First Webpage</title> <meta charset="utf-8"> <meta name="description" content="This is my first website. It includes lots of information about my life."> </head> <body> <h1>Welcome to my webpage</h1> <p>Welcome to <em>my</em> brand new website.</p> <p>This site will be my <strong>new</strong> home on the web.</p> <a href="/page2.html">Page2</a> <img src="testpic.jpg" alt="This is a test image" height="42" width="42"> <p>This website will have the following benefits for my business:</p> <ul> <li>Increased traffic</li> <li>Global Reach</li> <li>Promotional Opportunities</li> </ul> <table> <tr> <td>Row 1 - Column 1</td> <td>Row 1 - Column 2</td> </tr> <tr> <td>Row 2 - Column 1</td> <td>Row 2 - Column 2</td> </tr> </table> </body> </html>
page2.html troubleshooting code:
<!DOCTYPE html> <html> <head> <title>My First Webpage</title> <meta charset="utf-8"> <meta name="description" content="This is my first website. It includes lots of information about my life."> </head> <body> <h1>Welcome to my webpage</h1> <p>Welcome to <em>my</em> brand new website.</p> <p>This site will be my <strong>new</strong> home on the web.</p> <a href="http://www.google.com">Google</a> </body> </html>
Reference
All the documentation in this page is taken from
HTML.com